
Direct-planting hardwood cuttings
DJ Elder growing / Orchard design
One method of propagating elder plants is planting dormant, unrooted hardwood cuttings directly into the orchard soil. The unrooted cuttings are essentially sticks, so we call this a “stick” planting method.
Does it work? We decided to find out.
In the spring of 2020, some of our elder bushes were old enough to harvest cuttings. In early April, we direct-planted one full row of our home-grown York sticks and a partial row of Nova sticks.
The videos and photos below are an overview of how we planted the sticks and how the cuttings performed.
Preparing the site
We used a no-till, no-herbicide method. The grass and other vegetation within the row was first mowed as short as possible (scalped) to stunt the grass, and the cuttings planted directly into this sod. We added a thick layer of mulch to smother most of the weeds and grass and will remove stubborn weeds by hand as needed.
If you do not want to till or use glyphosate (Roundup) to kill existing grass and weeds, it is extremely important to mow the vegetation as short as you safely can before planting. Scalping the ground with a mower can be hard on the mower blade, but scalping will stunt the grass and weeds so the mulch has more time to smother and kill most of this unwanted vegetation.
We used a heavyweight paper mulch with a hard, flat surface finish to prepare the experimental rows shown in these videos. In the past, we have used a heavyweight paper mulch with a softer “creped” finish instead. The creped paper works better for us.
Creping adds a stretchy, crinkly texture which helps the paper lie flat on the ground, especially after it has been wetted. This discourages weed growth along the edges of the paper and makes the paper less prone to being lifted by the wind.
Old newspapers are a low- or no-cost alternative to purchased paper mulch. We lay down 4-6 sheets per layer and overlap the edges to make a thick, continuous covering. Once wetted, newsprint also lies flat.
Planting the cuttings
“Stick” planting should be done as early in spring as is practical, so the cool weather of early spring can inhibit the growth of leaves. If too many leaves sprout before the roots can develop, the cutting will die.
We normally plant rooted cuttings or established plants about 2 feet apart within a row. For this experimental “stick” planting, we spaced the cuttings about 1 foot apart within the row, because we have no idea going into this project what the survival rate will be. Based on what we learn from this experiment, we may use a wider spacing for future stick plantings.
An elderberry cutting normally has 4 buds — a pair of buds at the top and a pair near the bottom. Ideally the buds should not show any green at the time they are planted. The bottom buds are pushed below the soil surface while the upper buds remain above the ground.
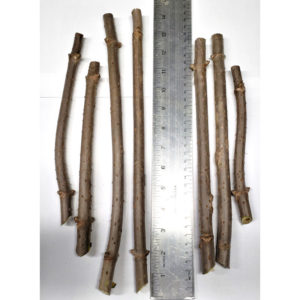
It takes a lot of force to push a cutting directly into our soil, and that is hard on hands and on the cuttings. We chose larger cuttings for this planting method; sturdy sticks like those in the photo (above) worked well.
We experimented with ways to quickly cut a small, deep hole in the soil. What worked best was pushing the tip of an old bayonet straight down into the ground about 6 inches deep.
We found planting was even easier if we made one cut with the blade, rotated the blade 90 degrees, and then pushed it into the same hole again to make an “X” shaped hole.
We tried to minimize damage to the bottom buds by aligning the buds so their tips pointed along one of the “X” cuts made by the knife.
We also learned to push the cuttings into the soil using care to avoid damaging the top buds. That said, a little damage is inevitable. The bottom buds often develop shoots as well as roots, so we just did our best and did not worry too much about damaging a few of the top buds.
After planting several dozen cuttings just with gloved hands, we realized we had to find a hand-saver to spread out the force. A bright yellow plastic cap borrowed from a tee post in a nearby fence became an ideal hand-saver, as shown in the video below. A small piece of wood with a large hole drilled in it, a PVC end cap for sewer pipe, or similar object will work just as well — anything to spread out the force.
Adding starter fertilizer and a final mulch of hay
We used old hay for the top mulch, but any type of heavy mulch will work, including wood chips from a municipal compost site, forestry service, or garden supply. Chips from municipal compost sites can contain varying amounts of plastic and metal bits, so try to get chips from a pile that is as clean as possible.
We had some very windy days after planting these experimental rows. Even with a generous layer of hay, the wind lifted and dislodged the smooth-finished paper mulch and hay. This has not been a problem with rows covered with a creped paper mulch and similar layer of hay, so I am inclined to think the smooth paper is the culprit.
To solve this problem, we added more hay and pinned the mulch in place with temporary stakes (step-in electric fence posts, to be exact). As the weeks go by, the paper and hay should mat down and become more wind resistant. We will eventually remove the stakes.
Seven weeks after planting
Chuck irrigated the “stick” plantings a couple of times in the weeks after planting. Since then, the hay and paper mulch and a few rain showers have kept the soil sufficiently moist.
The Nova sticks are looking really good which is a happy surprise. When we propagate Nova cuttings in pots, a large majority do not survive. Stick planting may be an excellent way to propagate this variety.
The York sticks appear to be a tiny bit less vigorous compared with the Nova sticks. Compared to York cuttings started in pots, however, the stick planted Yorks are performing very well.
At this point in late May, I estimate 5-10 cuttings per 100 sticks planted are not showing any shoots or other signs of life. Elder cuttings often surprise us by sprouting shoots long after we have given up hope, however, so we will wait until fall before making a final conclusion about the actual loss.


Seven months after planting
As of October, the overall failure rate of our stick planting trial is about 5%. In other words, about 1 stick in 20 did not grow.
We irrigated another time during a dry spell in August. We also weeded and re-mulched the rows toward the end of summer to reduce weed competition and keep the soil cooler and more moist. Otherwise these young plants have been on their own, and they have thrived surprisingly well.
We are very happy with these results. This stick planting method eliminates all of the labor and materials needed to root cuttings, dormant sticks are easier to plant compared with rooted cuttings and established plants, and the failure rate is considerably lower compared with rooted cuttings.